how to draw 3d with straight edge
Introduction
Strict interpretation of geometric construction allows employ of only the compass and an instrument for drawing straight lines, and with these, the geometer, post-obit mathematical theory, accomplishes his solutions. In technical drawing, the principles of geometry are employed constantly, but instruments are non limited to the bones two as T-squares, triangles, scales, curves etc. are used to make constructions with speed and accurateness. Since there is continual application of geometric principles, the methods given in this topic should be mastered thoroughly. It is assumed that students using this book understand the elements of plane geometry and will be able to apply their noesis.
The constructions given hither afford fantabulous practise in the employ of instruments. Recollect that the results you obtain will be just as accurate as your skill makes them. Take care in measuring and cartoon so that your drawings will exist accurate and professional in appearance.
- Geometric Nomeniclature
A. Points In Space
A point is an exact location in space or on a drawing surface.
A point is actually represented on the cartoon by a crisscross at its verbal location. The exact point in infinite is where the two lines of the crisscross intersect. When a point is located on an existing line, a light, brusque dashed line or cantankerous bar is placed on the line at the location of the exact point. Never represent a point on a drawing by a dot; except for sketching locations.
B. Line
Lines are direct elements that have no width, but are space in length (magnitude), and they tin can be located past ii points which are not on the same spot but fall along the line. Lines may exist straight lines or curved lines. A directly line is the shortest altitude between two points. Information technology tin can be drawn in any direction. If a line is indefinite, and the ends are non stock-still in length, the bodily length is a matter of convenience. If the stop points of a line are important, they must be marked by ways of pocket-size, mechanically drawn crossbars, equally described by a pint in space.
Straight lines and curved lines are considered parallel if the shortest distance between them remains constant. The symbol used for parallel line is //. Lines, which are tangent and at ninety⁰ are considered perpendicular. The symbol for perpendicular line is ⊥.

C. Angle
An angle is formed past the intersection of two lines. There are 3 major kinds of angles: right angels, astute angles and
obtuse angles. The right angle is an angle of 90⁰, an astute
Bending is an bending less than 900, and an obtuse angle is an
Bending more than 90⁰, A direct line is 180⁰. The symbol for an angle is < (singular) and <'s (Plural). To describe an angle, use the drafting machine, a triangle, or a protractor.

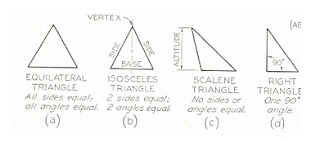
D. Triangles
A triangle is a airtight airplane figure with three straight sides and their interior angles sum up exactly 1800. The various kinds of triangles: a right triangle, an equilateral triangle, an isosceles triangle, and an obtuse angled triangle.
Due east. Quadrialteral
It is a plane figure divisional by four straight sides. When contrary sides are parallel, the quadrilateral is too considered to be a parallelogram.

F. Polygon
A polygon is a airtight plane figure with 3 or more straight sides. The near important of these polygons equally they chronicle to drafting are probably the triangle with iii sides, foursquare with 4 sides, the hexagon with six sides, and the octagon with 8 sides.

G. Circle
A circle is a airtight curve with all points on the circle at the same altitude from the center point. The major components of a circle are the diameter, the radius and circumference.
- The diameter of the circle is the direct distance from one outside curved surface through the eye point to the opposite outside curved surface.
- The radius of a circle is the distance from the eye point to the exterior curved surface. The radius is half the diameter, and is used to set the compass when drawing a diameter.
- A central angle: is an angle formed by 2 radial lines from the eye of the circumvolve.
- A sector: is the area of a circumvolve lying between 2 radial lines and the circumference.
- A quadrant: is a sector with a primal bending of 900 and ordinarily with one of the radial lines oriented horizontally.
- A chord: is any straight line whose opposite ends stop on the circumference of the circle.
- A segment: is the smaller portion of a circle separated past a chord.
- Concentric circles are two or more than circles with a common center signal.
- Eccentric circles are two or more circles without a mutual center point.
- A semi circle is half of the circle.

H. Solids
They are geometric figures bounded by plane surfaces. The surfaces are called faces, and if these are equal regular polygons, the solids are regular polyhedra.

- Techniques Of Geometric Constructions
To construct the above mentioned geometric figures, we have to know some principles and procedures of geometric construction. Thus, the remaining of this chapter is devoted to illustrate step-past-footstep geometric construction procedures used by drafters and technicians to develop various geometric forms.
A. How To Bifurcate A Line Or An Arc
To bisect a line ways to divide it in half or to detect its center point. In the given process, a line will as well exist constructed at the verbal center bespeak at exactly 90⁰.
Given: Line A-B.
Step ane: Set the compass approximately two-thirds of the length of line A-B and swing an arc from bespeak A.
Step 2: Using the exact same compass setting, swing an arc from signal B.
Footstep 3: At the two intersections of these arcs, locate points D and E.
Step 4: Draw a direct-line connecting point D with point Due east.
Where this line intersects line A-B, it bisects line A-B.
Line D-E is also perpendicular to line A-B at the exact center indicate.

B. How To Divide A Line In To Number Of Equal Parts
Given: Line A-B.
Step 1: Draw a construction line AC that starts at finish A of given line AB. This new line is longer than the given line and makes an angle of non more than 300 with it.
Pace 2: Notice a scale that will approximately divide the line AB in to the number of parts needed (11 in the example beneath), and mark these divisions on the line AC.
There are at present 'n' equal divisions from A to D that lie on the line AC (xi in this example).
Step iii: Set the adjustable triangle to draw a construction line from point D to point B. Then draw construction lines through each of the remaining 'n-1' divisions parallel to the first line BD by sliding the triangle along the straight edge. The original line AB will at present be accurately divided.

C. How To Bisect An Angle
To bifurcate an bending means to divide information technology in half or to cut it in to two equal angles.
Given: Bending BAC.
Step 1: Set the compass at any user-friendly radius and swing an arc from bespeak A.
Step 2: Locate points E and F on the legs of the angle, and swing two arcs of the aforementioned identical length from points Due east and F, respectively.
Footstep three: Where these arcs intersect, locate point D. Draw a straight line from A to D. This line will bifurcate angle BAC and establish ii equal angles: CAD and BAD.

D. How To Depict An Arc Or Circle (Radius) Through 3 Given Points
Given: Three points in space at random: A, Band C.
Step ane: With straight line, lightly connect points A to B, and B to C.
Step two: Using the method outlined for bisecting a line, bisect lines A-B and B-C.
Step iii: Locate point X where the 2 extended bisectors run across. Signal X is the verbal center of the arc or circle.
Step 4: Place the bespeak of the compass on point X and adjust the lead to whatever of the points A, B, or C (they are the aforementioned altitude), and swing the circle. If all work is done correctly, the arc or circle should laissez passer through each point.

E. How To Describe A Line Parallel To A Directly Line At A Given Distance
Given: Line A-B, and a required distance to the parallel line.
Step 1: Gear up the compass at the required altitude to the parallel line. Place the point of the compass at any location on the given line, and swing a light arc whose radius is the required altitude.
Pace two: Accommodate the straight edge of either a drafting automobile or an adjusted triangle and so that it line sup with line A-B, slide the straight border up or downward to the farthermost high point, which is the tangent point, of the arc, then describe the parallel line.

F. How To Depict A Line Parallel To A Line Curved Line At A Given Altitude
Given: Curved line A-B, and a required distance to the parallel line,
Step 1: Set the compass at the required distance to the parallel line. Starting from either stop of the curved line, place the point of the compass on the given line, and swing a serial of light arcs along the given line.
Step 2: using an irregular curve, depict a line along the farthermost high points of the arcs.

G. How To Draw A Perpendicular Lines To A Line At A Signal
Method 1
Given: Line A-B with indicate P on the same line.
Step ane: Using P as a center, make ii arcs of equal radius or more continuous arc (R1) to intercept line A-B on either side of point P, at points South and T.
Step 2: Swing larger but equal arcs (R2) from each of points South and T to cantankerous each other at point U.
Step 3: A line from P to U is perpendicular to line A-B at bespeak P.

H. How To Draw A Perpendicular To A Line A t A Indicate
Method 2
Given: Line A-B with point P on the line.
Step 1: Swing an arc of any convenient radius whose center O is at any user-friendly location NOT on line A-B, but positioned to make the arc cross line A-B at points P and Q.
Stride 2: A line from betoken Q through centre O intercepts the opposite side of the arc at indicate R.
Step 3: Line R-P is perpendicular to line A-B (A right angle has been inscribed in a semi circumvolve).

I. How To Describe A Perpendicular To A Line From A Indicate Not On The Line
Given: Line A-B and point P.
Step ane: Using P as a center, swing an arc (R1) to intercept line A-B at points G and H.
Pace two: Swing larger, but equal length arcs (R2) from each of the points M and H to intercept each other at point J.
Step 3: Line P-J is perpendicular to line A-B.


J. How To Describe A Triangle With Known Lengths Of Sides
Given: lengths one, two, and 3.
Step 1: Draw the longest length line, in this example length 3, with ends A and B. Swing an arc (R1) from point A whose radius is either length 1 or length two; in this example length 1.
Step 2; using the radius length not used in footstep ane, swing an arc (R2) from bespeak B to intercept the arc swung from signal A at point.
Step 3: Connect A to C and B to C to complete the triangle.

Thou. How To Draw A Square
Method-1
Given: The locations of the center and the required distance beyond the sides of a foursquare.
Pace ane: Lightly draw a circumvolve with a diameter equal to the distance around the sides of the square. Ready the compass at half the required diameter.
Stride two: Using triangles, lightly complete the foursquare past amalgam tangent lines to the circle. Allow the light structure lines to project from the foursquare, with out erasing them.
Step iii: Bank check to see that at that place are 4 equal sides and, if so, darken in the actual foursquare using the correct line thickness.

Method-2
Given one side AB. Through point A, describe a perpendicular.
With A every bit a center, and AB as radius; draw the arc to intersect the perpendicular at C. With B and C as centers, and AB as radius, strike arcs to intersect at D. Draw line CD and BD.

L. How To Draw A Pentagon (5 Sides)
Given: The locations of the pentagon eye and the diameter that will delimit the pentagon.
Pace i: Bisect radius OD at C.
Footstep two: With C as center, and CA as radius, strike arc AE.
With A equally eye, and AE as radius, strike arc EB.
Step 3: Draw line AB, and then ready off distances AB around the circumference of the circle, and describe the sides through these points.

Thousand. How To Draw A Hexagon (6 Sides)

Due north. To Depict Whatsoever Sided Regular Polygon
To construct a regular polygon with a specific number of sides, divide the given diameter using the parallel line method as shown in fig below. In this example, allow us assume 7 sided regular polygon. Construct an equilateral triangle (0-vii-8) with the bore (0-7) as ane of its sides. Describe a line from the noon (point 8) through the second point on the line (point 2). Extend line 8-2 until it intersects the circumvolve at point 9.
Radius 0-ix will exist the size of each side of the figure. Using radius 0-ix steps off the corners of the seven sides polygon and connect the points.

O. To Draw A Circle Tangent To A Line At A Given Signal
Given: Given line AB and a point on the line.
Step 1: At P erect a perpendicular to the line.
Step ii: Set off the radius of the required circle on the perpendicular.
Footstep 3: Draw circle with radius CP.

P. To Draw A Tangent To A Circle Through A Indicate
Method-1
Given: Indicate P on the circle.
Move the T-square and triangle every bit a unit until one side of the triangle passes through the betoken P and the center of the circle; then slide the triangle until the other side passes through point P, and draw the required tangent.
Method-2
Given: Point P outside the circumvolve.
Move the T-square and triangles as a unit of measurement until 1 side of the triangle passes through point P and, by inspection, is the tangent to the circle; and then slide the triangle until the other side passes through the center of the circle, and lightly mark the bespeak of tangency T. finally motion the triangle back to its starting position and draw the required tangent.

Q. To Draw Tangents To Two Circles
Motility the T-square and triangles as a unit until i side of the triangle is tangent, by inspection, to the 2 circles; so slide the triangle until the other side passes through the center of one circle, and lightly marker the point of tangency. Then slide the triangle until the side passes through the eye of the other circumvolve, and mark the point of tangency. Finally slide the triangle dorsum to the tangent position, and draw the tangent lines between the two points of tangency. Draw the 2nd tangent line in like manner.

R. How To Construct An Arc Tangent To An Angle
Given: A correct angle, lines A and B and a required radius.
Step 1: Set the compass at the required radius and, out of the way, swing a radius from line A and 1 from line B.
Step two: From the farthermost high points of each radius, construct a light line parallel to line A and another line parallel to line B.
Footstep 3: Where these lines intersect is the verbal location of the required swing point. Set the compass indicate on the swing point and lightly construct the required radius.
Allow the radius swing to extend past the required area. Information technology is important to locate all tangent points (T.P) earlier darkening in.
Step 4: Check all work and darken in the radius using the right line thickness. Darken in connecting direct lines as required. E'er construct compass work offset, followed by straight lines. Leave all lite structure lines.

Southward. How To Construct An Arc Tangent To Two Radii Or Diameters
Given: Bore A and arc B with center points located, and the required radius.
Step 1: Gear up the compass at the required radius and, out of the manner, swing a radius of the required length from a point on the circumference of given bore A. Out of the fashion, swing a required radius from a point on the circumference of a given arc B.
Step 2: From the farthermost high points of each radius, construct a light radius exterior of the given radii A and B.
Step 3: Where these arcs intersect is the verbal location of the required swing indicate. Gear up the compass point on the swing point and lightly construct the required radius.
Allow the radius swing to extend past the required surface area.
Step 4: Bank check all piece of work; darken in the radii using the correct line thickness. Darken in the arcs or radii in consecutive order from left to correct or from right to left, thus constructing a smooth connecting line having no apparent modify in direction.

T. To Draw An Ellipse (By Four-Centered Method)
Join 1 and three, layoff 3-5 equal to 01-03. This is washed graphically as indicated in the fig. Below by swinging one around to 5 with O as center where at present 03 from 05 is iii-v; the required altitude. With 3 as center, an arc from 5 to the diagonal 1-3 locates six. Bisect 1-6 past a perpendicular crossing
0-1 at 9 and intersecting 0-4 produced (if necessary) at 10.
Brand 0-ix' equal to 0-9, and 0-x' equal to 0-10. Then ix, 9', x, and 10' will be centers for four tangent circle arcs forming a bend approximating the shape of an ellipse.

U. How To Draw An Ogee Curve
An ogee curve is used to join two parallel lines. It forms a gentle curve that reverses itself in a keen symmetrical geometric grade.
Given: Parallel lines A-B and C-D.
Step 1: Draw a directly line connecting the infinite between the parallel lines. In this example, from point B to point C.
Step 2: Brand a perpendicular bisector to line B-C to establish indicate X.
Step 3: Draw a perpendicular from line A-B at point B to intersect the perpendicular bisector of B-X, which locates the first required swing center. Describe a perpendicular from line C-D at signal C to intersect the perpendicular bisector of CX, which locates the 2d required swing center.
Step 4: Place the compass bespeak and adjust the compass lead to point B, and swing an arc from B to X. Identify the compass point on the second swing point and swing an arc from X to C. This completes the ogee curve.

torrencewousbacan.blogspot.com
Source: https://edengdrawing.blogspot.com/2013/03/geometric-construction.html
Enviar um comentário for "how to draw 3d with straight edge"